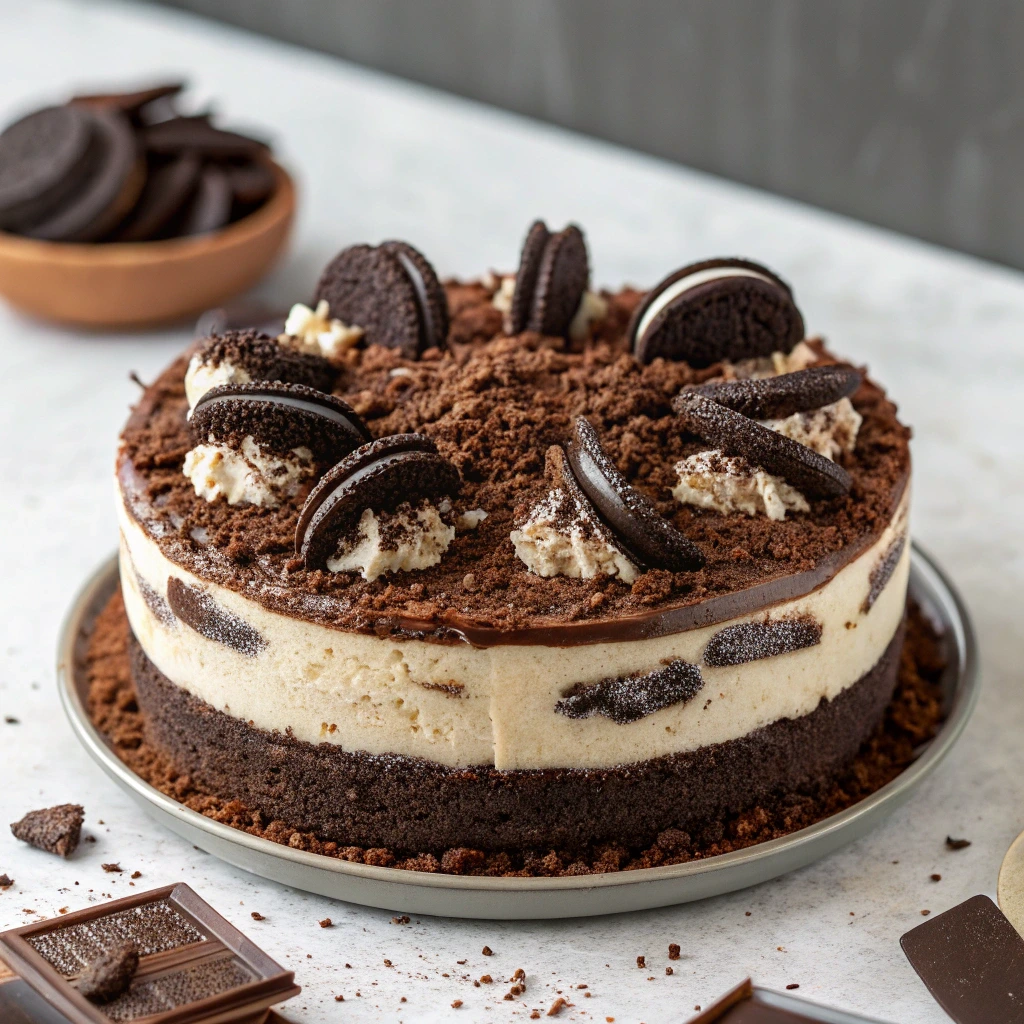
How to Make Oreo Dirt Cake Delicious No-Bake Dessert
Every family gathering has that one dessert that brings instant smiles and childhood memories flooding back. For me, the Oreo dirt cake has always been that magical treat. It turns simple ingredients into a playful, delicious creation that captures the imagination of both kids and adults.
The Oreo dirt cake is more than just a dessert – it’s an experience. Imagine layers of crushed chocolate cookies mimicking rich soil, creamy pudding blending seamlessly, and perhaps a few gummy worms peeking through to add a touch of whimsy. This dessert recipe is not just about taste, but about creating moments of pure joy.
Whether you’re preparing for a family picnic, kids’ party, or simply craving a nostalgic sweet treat, this Oreo dirt cake will become your go-to easy no-bake treat. It requires minimal effort but delivers maximum delight.
Table of Contents
What Makes Oreo Dirt Cake a Perfect No-Bake Dessert
Explore the enchanting world of a dessert loved by kids and adults since the 1980s. Oreo Dirt Cake is a fun, tasty treat that brings smiles to everyone’s faces. Its unique look and creamy feel make it a favorite for any event.

A Delightful Culinary Journey
The classic dirt cake is a creative mix of simple ingredients into a fantastic dessert. It combines Oreo cookies with a smooth cream cheese frosting. This mix creates a memorable taste experience.
Why Everyone Loves This Dessert
- Its playful look makes it seem like a garden or dirt landscape
- The creamy texture is rich and pleases the taste buds
- It’s easy to make without baking
- It’s a nostalgic treat that brings back childhood memories
Benefits of No-Bake Preparation
No-bake desserts like Oreo Dirt Cake have many benefits for cooks:
- They save time in the kitchen
- No oven or baking skills needed
- Great for hot summer days
- Can be made ahead of time
| Preparation Aspect | Details |
|---|---|
| Total Preparation Time | 20 minutes |
| Chill Time | 2 hours |
| Servings | 20 servings |
| Calories per Serving | 256 kcal |
Looking for a kid-friendly dessert that adults will love too? Oreo Dirt Cake with its rich cream cheese frosting is ideal. It’s a flexible recipe for any celebration or a special treat.
Essential Ingredients for OREO DIRT CAKE
To make a perfect Oreo dirt cake, you need the right ingredients. Crushed Oreos are key, giving the cake its “dirt-like” look and deep chocolate taste.
Here’s what you’ll need for an amazing Oreo dirt cake:
- 80 Oreo cookies (for crushing)
- 2 packages of instant vanilla pudding mix
- 8 oz cream cheese
- 4 cups milk
- 12 oz Cool Whip
- 1 pack of gummy worms (optional)
Choosing the right crushed Oreos is important. You’ll need about 1-1/3 cups for the base. The pudding mix is crucial for the creamy texture that everyone loves.
| Ingredient | Quantity | Purpose |
|---|---|---|
| Oreo Cookies | 80 cookies | Creates “dirt” texture and chocolate flavor |
| Instant Pudding Mix | 2 boxes (3-4 oz each) | Provides creamy consistency |
| Cream Cheese | 8 oz | Adds richness and smooth texture |
If you need a gluten-free version, use gluten-free Oreos. For a low-fat option, use fat-free cream cheese and skip the butter. Pro tip: The quality of your ingredients directly impacts the final taste of your Oreo dirt cake!
Kitchen Tools and Equipment Needed
To make a tasty Oreo dirt cake, you need the right kitchen tools. Having the right equipment makes cooking fun and easy.
Required Mixing Tools
For a great dessert, you’ll need some key tools:
- Large mixing bowl
- Electric mixer
- Rubber spatula
- Measuring cups and spoons
- Food processor or rolling pin (for crushing Oreos)
Serving Container Options
How you serve your dirt cake is important. Here are some good choices:
- Clear glass trifle dish
- Individual parfait glasses
- Large decorative serving bowl
- Mason jars for individual portions
Optional Decorating Tools
Make your dessert look amazing with these tools:
- Piping bags
- Decorative spatulas
- Cookie crumble sifter
- Chocolate drizzle squeeze bottle
| Tool Category | Recommended Items | Purpose |
|---|---|---|
| Mixing | Electric mixer | Blend ingredients smoothly |
| Crushing | Food processor | Create fine Oreo cookie crumbs |
| Serving | Glass trifle dish | Display layered dessert beautifully |
| Decorating | Piping bag | Add artistic finishing touches |
Pro tip: Use clear serving containers to show off your Oreo dirt cake’s layers!
Preparing the Oreo Cookie Base
Making the perfect Oreo cookie base is key to a tasty dirt cake. You’ll turn your Oreos into a yummy crumb base. This base is the first layer of your dessert.
To make the crushed Oreos base, follow this method:
- Gather 32 Oreo cookies for the crust
- Choose your crushing technique:
- Food processor method
- Resealable plastic bag technique
- Crush cookies until they reach a fine, consistent crumb texture
- Melt 6 tablespoons of unsalted butter
- Mix crushed Oreos with melted butter
Professional bakers say crushed Oreos need precision. Aim for 1-1/3 cups of cookie crumbs for the base. The key is achieving a uniform texture – not too chunky, not too fine.
For the best results, press two-thirds of your crushed Oreos into the bottom of a 9×13-inch baking dish. This makes a solid base for your dirt cake. It will hold together beautifully when served.
Pro tip: Reserve the remaining crushed Oreos for topping. This will give your dessert that classic “dirt” appearance!
Creating the Creamy Pudding Mixture
Making the perfect pudding mixture is key to your Oreo dirt cake. This creamy layer turns your dessert into a showstopper. It combines rich flavors and smooth textures that everyone will love.
Mixing the Pudding Base
Begin by mixing your pudding with care. You’ll need a 3.9-ounce box of instant chocolate pudding mix and 2 cups of whole milk. Here’s how to do it:
- Whisk the pudding mix and milk together
- Beat until the mixture becomes smooth and starts to thicken
- Let the pudding sit for 3-5 minutes to achieve the right consistency
Adding Cream Cheese Layer
The cream cheese frosting adds a luxurious touch to your dessert. Soften 8 ounces of cream cheese at room temperature. Then, mix it with 1 cup of powdered sugar until smooth. This creates a rich and creamy base.
Combining the Layers
Fold the prepared pudding mix into the cream cheese mixture gently. This keeps the texture light and airy. The result is a decadent, silky layer that makes your Oreo dirt cake irresistible.
Pro tip: For the best consistency, use an electric mixer on low speed when combining the pudding mix and cream cheese. This ensures a perfectly smooth mixture without overmixing.
Assembly and Layering Techniques
Making the perfect oreo dirt cake needs careful assembly and layering. The success of your dessert depends on blending textures and flavors well.
Begin by preparing a 13×9-inch ungreased pan. The base of your cake is a crushed Oreo layer. Use about 1-1/3 cups of crushed Oreos for the bottom layer.
- Crush Oreos into fine crumbs
- Spread evenly in the pan
- Gently press to create a compact base
When adding the pudding, pour slowly and carefully. Gentle technique prevents disturbing the cookie base. Use two packages of instant vanilla pudding mix for a better look. You can also use chocolate pudding for a different look.
“The secret to a great oreo dirt cake is in the layers and presentation” – Dessert Experts
To make clear layers, alternate pudding and crushed Oreos. Sprinkle more cookie crumbs on top for a “dirt” look. Adding gummy worms can make your dessert look like a fun garden.
| Layer | Ingredients | Quantity |
|---|---|---|
| Base | Crushed Oreos | 1-1/3 cups |
| Pudding Layer | Instant Vanilla Pudding | 2 packages (3-4 oz each) |
| Topping | Additional Crushed Oreos | As desired |
Chill your oreo dirt cake for at least one hour before serving. This lets the layers set and flavors mix. Remember, make it only one day ahead to keep the texture right.
Creative Decoration Ideas and Presentation
Turn your Oreo dirt cake into a stunning dessert that everyone will love. Its playful look and creative touches make it a memorable treat. It’s all about how you present it.
Adding Gummy Worms for Visual Impact
Gummy worms add a fun touch to your dirt cake. They make it look like a real garden. This brings excitement and imagination to the table.
- Scatter gummy worms on top of the cake, peeking out from the “dirt”
- Create a layered look by nestling gummy worms between cookie crumb layers
- Use different colored gummy worms for added visual interest
Theme Party Decoration Variations
Your Oreo dirt cake can fit any party theme. It’s a great dessert for all kinds of celebrations.
| Theme | Decoration Suggestion |
|---|---|
| Garden Party | Use a flower pot, add artificial flowers, small gardening tools |
| Construction Theme | Decorate with toy trucks, small construction worker figurines |
| Nature Exploration | Add plastic insects, small rocks, leaf decorations |
Seasonal Decorating Tips
Make your dirt cake special for every season. Change its decorations to match holidays and times of the year.
- Halloween: Add spooky plastic spiders or skeleton decorations
- Spring: Incorporate pastel-colored gummy worms and edible flowers
- Summer: Use bright, tropical-colored decorative elements
Storage Tips and Make-Ahead Instructions
Making an Oreo dirt cake is simple and doesn’t need baking. It’s perfect for when you want a quick dessert. You can prepare it ahead of time, making it even more convenient.
Your dirt cake will stay fresh up to 3 days if you store it right. Here’s how to keep it at its best:
- Refrigerate the dessert for at least 1 hour before serving
- Keep the dirt cake covered to prevent moisture loss
- Store in the coldest part of your refrigerator
- Consume within 3 days for optimal taste and texture
Preparing your dessert early can save you time. You can put the parts together up to 2 days before. This lets the flavors mix well.
“Advance preparation is the secret to a stress-free and delicious dessert!” – Baking Enthusiasts Magazine
Pro tip: If the cookie layers get soft after chilling, it’s okay. The softness is part of the dirt cake’s charm. It doesn’t ruin the taste.
Quick Make-Ahead Prep Strategy
- Prepare pudding mixture
- Crush Oreo cookies
- Layer ingredients in serving container
- Refrigerate for at least 1 hour
- Add decorative elements before serving
By using these storage tips, your Oreo dirt cake will be a hit. It’s easy to make and always a crowd-pleaser.
Nutritional Information and Serving Size
Enjoying this dessert recipe means knowing its nutritional facts. A serving of Oreo dirt cake has about 296 calories. It’s best to have it in moderation. Each serving has 42 grams of carbs, 5 grams of protein, and 13 grams of fat.
This dessert is flexible for different diets. You can make a low-fat version by using fat-free cream cheese and skipping the butter. If you’re gluten-sensitive, use gluten-free Oreos and pudding mix. It makes 24 servings, with each having 27 grams of sugar and little fiber.
It’s rich in nutrients like 218 IU of Vitamin A, 80 mg of calcium, and 4 mg of iron. While it’s a treat, it can fit into a balanced diet if eaten now and then. Keep leftovers in the fridge for up to three days for the best taste and texture.
Remember to control your portions. The serving size lets you enjoy it without overeating. It’s perfect for kids’ parties or family gatherings. Both kids and adults will love this tasty dessert.
FAQ
What exactly is Oreo dirt cake?
Oreo dirt cake is a no-bake dessert that looks like dirt. It’s made with crushed Oreos, creamy pudding, and cream cheese. It’s topped with gummy worms for fun. It’s a hit with both kids and adults because it’s tasty and looks cool.
Is Oreo dirt cake difficult to make?
No, it’s super easy! You don’t need to cook it. Just mix, layer, and chill. It takes about 20-30 minutes to make, perfect for quick desserts.
Can I make Oreo dirt cake ahead of time?
Yes, it’s great for making ahead. You can prep it 1-2 days before. Chilling it makes the flavors better and the texture smoother.
Are there any variations for dietary restrictions?
Yes, you can make it for different diets. Use gluten-free Oreos, dairy-free cream cheese, and plant-based pudding. This way, it fits various dietary needs.
How long does Oreo dirt cake last in the refrigerator?
It stays fresh for 3-5 days in an airtight container. The cookie layers might get softer, but it still tastes great.
Can I freeze Oreo dirt cake?
You can freeze it, but it might change texture when thawed. Wrap it tightly and eat within 2-3 weeks. Thaw in the fridge overnight before serving.
What are some creative ways to decorate Oreo dirt cake?
You can add chocolate rocks, edible flowers, or mini garden tools. Decorate it for Halloween or a birthday party for fun.
Is Oreo dirt cake kid-friendly to make?
Yes, kids can help a lot! They can crush cookies, mix, and add gummy worms. It’s a fun way for them to help in the kitchen.
What type of serving container works best?
Use clear glass trifle dishes, mason jars, or plastic cups. They show off the layers and “dirt” effect, making it look amazing.
Can I use generic chocolate sandwich cookies instead of Oreos?
You can try other cookies, but Oreos are best. They give the dessert a unique flavor and texture that generic brands can’t match.
How to Make Oreo Dirt Cake Delicious No-Bake Dessert
- Total Time: PT1H20M
- Yield: 10–12 servings 1x
Description
Discover how to make Oreo Dirt Cake, a no-bake, layered dessert filled with creamy goodness and a chocolatey crunch. Perfect for any occasion!
Ingredients
- 80 Oreo cookies (for crushing)
- 2 packages of instant vanilla pudding mix
- 8 oz cream cheese
- 4 cups milk
- 12 oz Cool Whip
- 1 pack of gummy worms (optional)
Instructions
Making an Oreo dirt cake is simple and doesn’t need baking. It’s perfect for when you want a quick dessert. You can prepare it ahead of time, making it even more convenient.
Your dirt cake will stay fresh up to 3 days if you store it right. Here’s how to keep it at its best:
- Refrigerate the dessert for at least 1 hour before serving
- Keep the dirt cake covered to prevent moisture loss
- Store in the coldest part of your refrigerator
- Consume within 3 days for optimal taste and texture
- Prep Time: PT20M
- Cuisine: American
Nutrition
- Calories: 450 kcal
- Sugar: 40 g
- Sodium: 350 mg
- Fat: 25 g
- Trans Fat: 2 g
- Carbohydrates: 55g
- Fiber: 2 g
- Protein: 5 g
Keywords: dessert recipe, oreo dirt cake
Did You Try Our Recipe ?
There are no reviews yet. Be the first one to write one.